FREE Mini Crochet Mandala

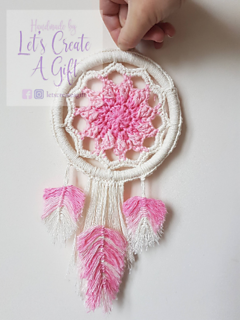
After spending way too much time browsing the internet trying to find an easy small Manadala pattern I was blown away by all the amazing intricate designs but I just couldn’t find something simple and easy to make so I decided to create my own and here it is. You can get some amazing designs simply by changing the colour schemes and feather designs. This pattern includes the pattern for the dreamcatcher in the hoop, how to add the hoop and how to create the lovely handmade feathers and tassels. You are free to use this pattern to make and sell your makes however could I kindly ask that you do not distribute the pattern freely and instead direct people to where you purchased the pattern.  


If you’d like to purchase the ad free pattern so that you can print it and use it anytime its available in both UK and US terms, super cheap on Ravelry and Etsy (use code LCAGBLOG for 25% off on Etsy)

Ravelry – https://www.ravelry.com/patterns/library/small-dream-catcher
Etsy- https://letscreateagiftca.etsy.com/listing/1403178952

You will need

E (3.5mm) or G (4mm) size crochet hook 

3 colours of your chosen cotton (I Like Drops Paris) 

Needle for sewing in your ends 

5inch hoop (bag handle or a embroidery hoop would work) 

Fine comb 

Scissors

Terminology
SC – Single Crochet
DC – Double Crochet
HDC – Half Double Crochet
FPDC – Front post Double Crochet
SS – Slip stitch

Let’s create a Dream Catcher…..
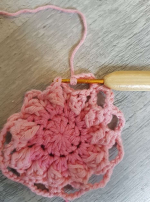
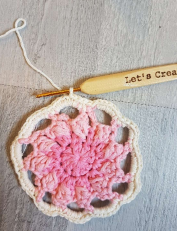
Colour A Magic Circle
R1 – 12 double crochet into the circle, pull tight
R2 – Ch3, HDC in to the first stitch. *Chain 1, HDC in the next stitch, Ch1, HDC in the same stitch* repeat all the way around and join with a slip stitch, *Change to Colour B*
R3 – Ch3, *2 FPDC around the first HDC from the previous row. Single Crochet into the top of the next HDC, Ch3* Repeat around and join with a slip stitch.
R4 – *Ch5, skip 5 stitches and SC into the 6th stitch to secure the chain* repeat around. (the DC is going into the end of the chain 3 from the previous round)


*Change to colour C*
R5 – *6SC into the chain space from previous row, 1 SC into the SC from previous row* repeat around


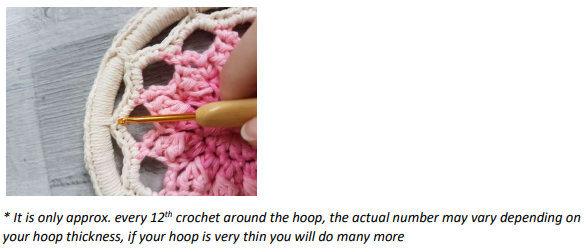
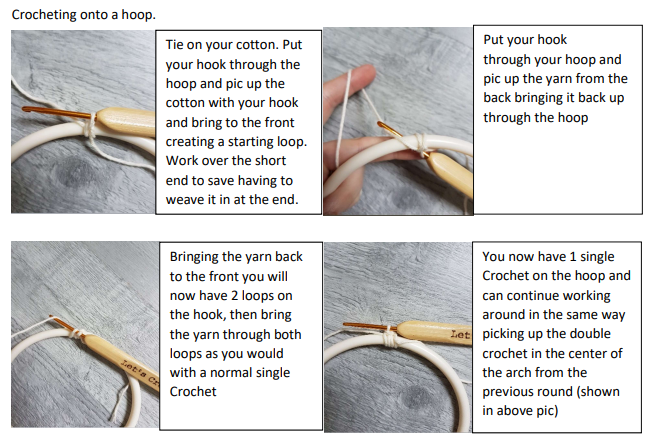
Adding the dreamcatcher to the hoop you will now crochet around the hoop and after approximately every 12th single crochet around the hoop single crochet through the middle single crochet from the previous round. You can use large stitch markers to attach the crocheted mandala to the hoop to ensure your attachments to the hoop are evenly spaced.
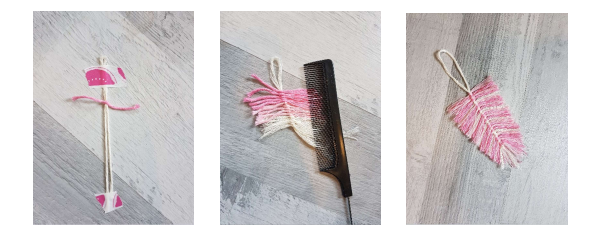


The Feathers.
You can use shop bought feathers if preferred but I love these feathers and they’re a great way to use up scraps of yarn from any project.

Feather 1 Cut a 30cm (12 inch) length of cotton (I used my colour C so it matches the hoop), fold in half and tape down to a hard surface.

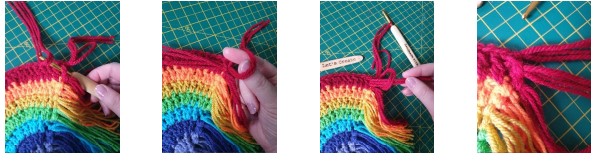
Put your hook through your hoop and pic up the yarn from the back bringing it back up through the hoop Bringing the yarn back to the front you will now have 2 loops on the hook, then bring the yarn through both loops as you would with a normal single Crochet You now have 1 single Crochet on the hoop and can continue working around in the same way picking up the double crochet in the centre of the arch from the previous round (shown in above pic) Tie on your cotton. Put your hook through the hoop and pic up the cotton with your hook and bring to the front creating a starting loop. Work over the short end to save having to weave it in at the end. Choose the colour for your feather and wrap your cotton around 3 fingers 25 times. If you find this tricky you can use a bank card or similar and wrap the yarn around width ways. On my large feather I used all 3 shades in alternating colours so did this 5 times with each colour. Once wrapped cut the cotton along the top so that you have 25 short lengths of cotton. Thread one of the short lengths under the taped down length from earlier. Tie in a knot over the long thread. Repeat this 24 times until you have all 25 lengths tied onto your large thread. Using a fine comb, comb the lengths outwards to separate the strands of cotton. This will make them look like fluffy feathers. You can then use your scissors to cut them into a feathery shape. 

Feathers 2 and 3
These are completed in the same way as above but with a shorter starting thread of only 14cm (6 inches). Rather than alternating colours on these feathers I did them in a gradient pattern, starting with the darkest colour and finishing with the same colour as the hoop.


Tassels
To add a bit of flare, add some tassels to the bottom of the hoop. Using the same colour as your hoop colour cut lengths of cotton in 30 cm (12 inch) lengths. Fold them in half and insert your crochet hook through the back of a single crochet on the hoop, hook your 30cm length in the center and pull it through part way. Fold the lengths back down through the loop you’ve made and pull tight. This will fasten the lengths onto your hoop. I used approx. 12 lengths but you could do as many or as few as you like to give a back drop to the beautiful feathers. Once you’ve added them all on you can again use your scissors to trim them, cutting them into a point gives a really nice finish. Again use your comb to give them a softer finish. 

I hope you enjoyed making your fabulous dream catcher! I would love to see it so if you share on social media don’t forget to let me know.  


If you make one don’t forget to tag me on Instagram or Facebook @letscreateagift and use the hashtag #letscreateagift.

Ravelry – https://www.ravelry.com/designers/lets-create-a-gift

TikTok – https://www.tiktok.com/@letscreateagift?

Etsy patterns, supplies and more – https://www.etsy.com/uk/shop/LetsCreateAGift?ref=seller-platform-mcnavFacebook – https://www.facebook.com/letscreateagift/
Youtube – https://www.youtube.com/channel/UCAqVuR1wC39D_31MovTXVJA?view_as=subscriber

FREE Gabby’s Dollhouse Doll crochet pattern

            Gabby’s Doll house doll                       


What you’ll need 

2.5mm crochet hook

I used left over 100% cotton all in DK (8/8) weight in various colours. Pink, White, Blue, brown, Black.

Safety eyes 10mm (or you can embroider them on)

Scissors and needle as always.

Abbreviations 

SC – Single Crochet (UK Double Crochet) 

HDC – Half Double Crochet (UK Half treble crochet) 

DC – Double Crochet (UK Treble Crochet) 

BLO – Back loop only 

SS – Slip Stitch

INC – Increase, 2 SC in the same stitch

DEC – join 2 stitches using the invisible decrease to prevent holes in your work.

Notes

This pattern is worked in the round, you may want to use stitch markers to mark the start of each round.

Legs will be joined using crochet so don’t tie off the last leg and continue working. You’ll work all the way up the body to the head so the only parts you’ll need to sew on are the arms and hair.
There are no specific instructions for when to add stuffing, just do this as you go along. 

Let’s Begin

Legs, make 2 but don’t fasten off the second leg.
Start with PINK
1. SC 6 in a magic ring (6)

2. INC in each stitch (12)

Switch to WHITE

3. SC in each stitch in BLO (12), this creates the base of the shoe

4. SC around(12)

5. 3SC, 3 DEC, 3SC (9)

6. SC around (9)
Switch to BROWN
7. SC around (9)

Switch to BLUE
8-15. SC around (9)

We are now going to join both legs together using crochet rather than sewing. Both legs should face forward so that the feet are pointing away from you. You’ll want to start this next part on the left hand side of the right leg. If you haven’t finished here just add some SC so that you are where you need to be.

INSERT IMAGE OF LEGS JOINING

16. CH2, join to the other leg in the opposing position, 9 SC, 2SC in the CH, 9 SC around the 1st leg, 2 SC on the other side of the CH (22)

17. Sc around (22)

18. 5 SC, DEC, 9 SC, DEC, 4 SC (20)

19. SC around (20)

Change to black

20. 4 SC, DEC, 8 SC, DEC, 4 SC (18)

White

21. SC around (18)

Black

22. 3 SC, DEC, 7 SC, DEC, 4 SC (16)

White

22. SC around (16)

Black
23. 6 SC, DEC, 6 SC, DEC (14)

White

24. Sc around (14)

Black
25. 5 SC, DEC, 5 SC, DEC (12)


Switch to Skin tone
26. SC around (12)
27. INC in each stitch around (24)
28. *SC, INC* repeat around (30)

29. *5 SC, INC* repeat around (42)
30. *INC, 6 SC* repeat around (48)

31-38. SC around (48)

If you’re using safety eyes you’ll want to do this before you close up the head as we’re now going to start decreasing.
39. *6 SC, DEC* repeat around (42)

40. *5 SC, DEC* repeat around (36)

41. *4 SC, DEC* repeat around (30)
42. *3 SC, DEC* repeat around (24)

43. *2 SC, DEC* repeat around (12)

44. *1 SC, DEC* repeat around (6)

45. DEC around and sew closed making sure that it is stuffed tightly.


Arms (Make 2, unless you’d like a 1 armed doll)

Skin Tone

1. 6 SC in a Magic Ring

2. SC around (6)

Bold pink
3-12 SC around (6)

(or as long as you’d like your arms to be). 

Jacket
bold pink

1. SC6 into a Magic ring (or use ch3, join and crochet into the circle if you don’t like the magic ring)

2. INC in each stitch (12)

3. *SC, INC* repeat around (18)

4. *SC, SC, INC* repeat around (24)

5. SC4, CH5, SK2 SC8, CH5, SK2, SC 8 (34)

6. Sc2, 2sc in the 3rd stitch, sc in the next 26 , 2sc in the next stitch, sc in the last 7 stitches (36)

7. *5 SC. INC* (42)

fasten off.

Attach the arms to either side of the body at the top. The holes in the jacket will slip over the arms and then you can attach to the body.

If you prefer you can attach the jacket and arms together and attach to the body as one piece

Headband with ears

Ear 1 – Black

Ch2, sc 2 in 2nd ch from hook (2)

Turn,ch1, sc 2 in 1st stitch. 1 sc in next (3)

Change to white

Turn, ch1, sc 2 in the first stitch, 1 sc in the next 2 (4)

Turn, ch1, sc 2 in the first stitch, 1 sc in the next 3 (5)

Ear 2 – White

Ch2, sc 2 in 2nd ch from hook

Turn,ch1, sc 2 in 1st stitch. 1 sc in next

Turn, ch1, sc 2 in the first stitch, 1 sc in the next 2 (4)

Turn, ch1, sc 2 in the first stitch, 1 sc in the next 3 (5)

Middle of ears make 2

Pink

Ch2, sc 2 in 2nd ch from hook

Turn,ch1, sc 2 in 1st stitch. 1 sc in next

Attach the pink triangles to the 2 ears.

Now to create the headband that the ears will attach to.

Option 1
Using white ch32, turn, sc back along the chain and sew on the ears.

Option 2

Sc7, sc5 working through the ear as well, sc 7, sc5 working through 2nd ear sc 7

Keep this to 1 side and attach to the front of the finished hair piece.

Hair piece – Dark Brown

1. 6 SC in a MR

2. *INC* In every stitch (12)
3. *SC, INC* around (18)

4. *2 SC, INC* around (24)

5. *3 SC, INC* around (30)

6. *4 SC, INC* around (36)

7. *5 SC, INC* around (42)

8-9. SC in each stitch around (42) This should fit tightly over your doll’s head.

This will now create the fringe shape to the hair.

10. HDC 22, SC 20

11. HDC 22, SC 19, SS  tie off and you can leave this thread long to sew the hair piece onto the head. 

Hair strands

CH 25, turn, 2 SC in each stitch all the way to the end, tie off and attach to the hair piece.


The hair strands can all be different lengths if you’d like. I made 24 hair strands in total. Some had slightly different lengths by adding or removing up to 4 chains. I used the shorter ones on the edges of the hair piece. The more you make the more full her hair will be so how many you make is totally up to you.

Once all your hair strands are attached you can then add the  headband and attach the finished hair piece to the head of the doll, and you’re done.

Tiktok – @letscreateagift  https://www.tiktok.com/@letscreateagift?lang=en

Instagram – @letscreateagift

Ravelry – https://www.ravelry.com/designers/lets-create-a-gift

Etsy – https://www.etsy.com/uk/shop/LetsCreateAGift?ref=seller-platform-mcnav

Facebook – https://www.facebook.com/letscreateagift/

Youtube – https://www.youtube.com/channel/UCAqVuR1wC39D_31MovTXVJA?view_as=subscriber

FREE Easy Peasy Infinity scarf pattern

Want to keep your neck warm but scarves just get on your nerves? An Infinity scarf is where it’s at! Easy and quick to whip up and endless stitch variations to choose from. This Easy Infinity is quick to make and gives you the basics to create multiple scarves.
For an add free version of the pattern you can buy it for less than a Tim’s coffee here on Ravelry

What you’ll need
I used 2 strands of Medium weight yarn which you’ll work together
I used Loops and Threads in Mustard and Green
6.5mm Crochet hook
Large needle for weaving in your ends.
Tape Measure.

Terminology US/UK
Foundation Half Double Crochet / Foundation Half Treble Crochet (see this quick YouTube tutorial if you’re not sure how to do this)
HDC BLO – Half Double Crochet in Back Loops Only / HTC in BLO Half Treble Crochet In Back Loops Only
SC Single Crochet / DC Double Crochet
CH Chain

Notes
You don’t really need a gauge swatch for this one, just have your handy tape measure ready and feel free to add or take away 1 or 2 stitches to have the scarf the length you like.
You’ll work 2 strands of Medium number 4/Aaran yarn together for this infinity scarf. You could use 2 different colours or 2 of the same colour. If you prefer to use 1 yarn you could try a Chunky/Bulky yarn instead.
Half Double Crochet foundation will allow your scarf to stretch and sit comfortably around your neck. Here is a video tutorial that will help (If all else fails then crochet a foundation chain nice and loose).
This scarf is not worked in the round as HDC joins tend to slant. Instead you’ll chain 1 at the end of each row which does NOT count as a stitch.

Let’s Create an Easy Peasy Infinity Scarf
140 foundation HDC
This should measure approx 27 inches.
CH1, Turn (Does not count as a Stitch)
Row 1 – HDC in each stitch all the way along (140)
CH1, Turn
Row 2 – HDC in BLO in each stitch all the way along (140)
CH1 Turn
Repeat until the scarf measures approx. 7 inches wide. This should be 10-11 rows in total depending on your hook and tension and if you started with a FHDC or a Foundation Chain and then a row of HDC.
Don’t tie off yet

Fold the scarf in half so that the 2 short ends are now meeting each other.

Using your crochet hook and the working yarn you’ll now crochet the 2 ends of the scarf together. Go through the stich on the side you’re working from and through the corresponding stitch on the other end of the scarf and then slip stitch. Image below.

Continue slip stitching through both sides of the scarf until you reach the end of the row. You can then tie off and use your needle to weave in your ends.
Your infinity scarf is now complete! Why not use your left over yarn to make a couple of matching headbands. My fave headband in the sweetbean twist headband from Fallon McNaughton which you can find here on ravelry.


Find more ways to connect, share photos and get free patterns and tutorials, find me on your favourite social.
Tiktok – @letscreateagift  https://www.tiktok.com/@letscreateagift?lang=en
Instagram – @letscreateagift
Ravelry – https://www.ravelry.com/designers/lets-create-a-gift
Etsy – ttps://www.etsy.com/ca/shop/LetscreateagiftCA?ref=shop_sugg_market
Facebook – https://www.facebook.com/letscreateagift/
Youtube https://www.youtube.com/channel/UCAqVuR1wC39D_31MovTXVJA?view_as=subscriber

FREE Wednesday Addams Crochet pattern


If you’d like to have this pattern as a downloadable PDF its available on ETSY and Ravelry.
Use code LCAGBLOG to get discount on all your pattern purchases on Ravelry and Etsy!


What you’ll need 

2.5mm crochet hook

I used left over 100% cotton 8/8 cotton from Hobbii in the following colours
Black, Light Grey,  White, pale skin tone. But any cotton of a similar thickness would be fine.

Debit Card or card of similar size to make the hair strands

Safety eyes (or you can embroider them on)

Scissors and needle as always.

Abbreviations 

SC – Single Crochet (UK Double Crochet) 

HDC – Half Double Crochet (UK Half treble crochet) 

DC – Double Crochet (UK Treble Crochet) 

BLO – Back loop only 

SS – Slip Stitch

INC – Increase, 2 SC in the same stitch

DEC – join 2 stitches using the invisible decrease to prevent holes in your work.

Notes

Legs will be joined using crochet so don’t tie off the last leg and continue working. You’ll work all the way up the body to the head so the only parts you’ll need to sew on are the arms and hair.
There are no specific instructions for when to add stuffing, just do this as you go along. 

Let’s Begin

Legs, make 2 but don’t fasten off the second leg.
Start with Black
1. SC 6 in a magic ring (6)

2. INC in each stitch (12)

3. SC in each stitch in BLO (12), this creates the base of the shoe

4. SC around(12)

5. 3SC, 3 DEC, 3SC (9)

6. SC around (9)
Switch to Grey
7-10. SC around (9)

Switch to skin tone
11-14. SC around (9)

Switch to Black

15. SC around (9)

We are now going to join both legs together using crochet rather than sewing. Both legs should face forward so that the feet are pointing away from you. You’ll want to start this next part on the left hand side of the right leg (see my high tech image below). If you haven’t finished here just add some SC so that you are where you need to be.
16. CH2, join to the other leg in the opposing position, 9 SC, 2SC in the CH, 9 SC around the 1st leg, 2 SC on the other side of the CH (22)

17. 5 SC, DEC, 9 SC, DEC, 4 SC (20)

18. SC around in BLO (20) (this is where you’ll attach the skirt later)
19. 4 SC, DEC, 8 SC, DEC, 4 SC (18)

20. SC around (18)

21. 3 SC, DEC, 7 SC, DEC, 4 SC (16)

22. SC around (16)
23. 6 SC, DEC, 6 SC, DEC (14)
24. 5 SC, DEC, 5 SC, DEC (12)
Switch to Skin tone
25. SC around (12)
26. INC in each stitch around (24)
27. *SC, INC* repeat around (36)

28. *5 SC, INC* repeat around (42)
29. *INC, 6 SC* repeat around (48)

30-38. SC around (48)

If you’re using safety eyes you’ll want to do this before you close up the head as we’re now going to start decreasing.
39. *6 SC, DEC* repeat around (42)

40. *5 SC, DEC* repeat around (36)

41. *4 SC, DEC* repeat around (30)
42. *3 SC, DEC* repeat around (24)

43. *2 SC, DEC* repeat around (18)

44. *1 SC, DEC* repeat around (12)

45. DEC around and sew closed making sure that it is stuffed tightly (6)

Skirt
Attach black yarn into one of the front loops only at the back of the body, continue to work in rounds.
1. SC around (22)
2. 5 SC, INC, 10 SC, INC, 5 SC (24)

3. *3 SC, INC* (30)

4-5. SC around (30)

6. *3 SC in the next stitch, SL in the next* Repeat this around. Tie off and weave in your end.

Arms (Make 2, unless you’d like a 1 armed doll)

Skin Tone

1. 6 SC in a Magic Ring

2. SC around (6)

White

     3-4. SC around (6)

Black
5-12 (or as long as you’d like your arms to be). SC around (6)

Sew the arms onto the top of the body near the neck.

Collar
CH 20 then work back down the chain
8 SC, HDC, DC CH 3 SL in the same stitch as the DC, SL in the next stitch CH3 DC in the same stitch as the CH3, HDC, 8 SC. Wrap around the dolls next, SL to join and sew onto the neck and weave in your end.

Hair – Black

1. 6 SC in a MR

2. * INC* around (12)

2. *SC, INC* around (18)

3. *2 SC, INC* around (24)

4. *3 SC, INC* around (30)

5. *4 SC, INC* around (36)

6. *5 SC, INC* around (42)

7. *6 SC, INC* around (48)

8-14. SC in each stitch around (48) This should fit tightly over your dolls head. If it doesn’t, and it’s too loose, then you can undo to round 6 and then SC in each stitch around for (42)

This will now create the fringe shape to the hair (if you have decreased the amount of stitches you finished with to 42 then you will have less HDC, although none of my pattern testers needed to do this)

15. HDC, 9 DC, HDC, SL, HDC, 9 DC, HDC (25) tie off and you can leave this thread long to sew the hair piece onto the head.

Hair strands
Option 1 – Plaits

Using your black yarn and a bank card wrap the yarn around the card 30 times and trim at one end. This will give you 30 pieces of black yarn to use as the long hair to plait. Add the strands, 2 at a time, starting at the HDC at the end of the fringe piece and add 15 to each side of the head. I do this by folding 2 strands in half together, inserting the hook through the SC of the last row of the hair, then pulling the strand through at the halfway point and folding the long strands through the loop created and pull tight.
Use a comb (preferably not a brush) to comb the strands to separate the yarn (if you use a brush it can go fuzzy and twist the yarn into 1 big twist). You can then plait these and add an elastic tie or use yarn to secure the end of the plait.

Option 2 – long hair
If you want the hair to be left long you can create around 40 strands or more and starting at the end of the fringe add 2 strands into every stitch around the whole hair piece to the other side of the head. Again, you’d want to comb this to make it smooth.
Sew the hair piece on around the edge of the hair piece and weave in the yarn.

Website – www.letscreateagift.com

Tiktok – @letscreateagift  https://www.tiktok.com/@letscreateagift?lang=en

Instagram – @letscreateagift

Ravelry – https://www.ravelry.com/designers/lets-create-a-gift

Etsy – ttps://www.etsy.com/ca/shop/LetscreateagiftCA?ref=shop_sugg_market

Facebook – https://www.facebook.com/letscreateagift/

Youtube – https://www.youtube.com/channel/UCAqVuR1wC39D_31MovTXVJA?view_as=subscriber

FREE Rainbow Wall Hanging

I’ve been making rainbow items for a while now like keyrings and soap savers (my fave are the mini keyrings, which are already listed on this blog) but I decided to upscale the pattern so that I could create a hanging decoration instead.
If you want to get the printable PDF with pictures and photo tutorial it’s available cheap on my Etsy store (use code LCAGblog for 50% off)

What you’ll need

  • 7 Different colours in Double knit/light worsted. If you don’t have rainbow colours in your stash my favourites are the Stylecraft Special DK (not used in these pictures as I was stash busting)
  • Lipstick, Jaffa, Sunshine, Kelly Green, Turquoise, Violet, Wisteria
  • Sharp scissors (or I used a rotary blade, metal ruler and a cutting mat)
  • Size 7 (4.5mm) hook (size is not critical so you could use a G or a H it will just alter the overall size)
  • Optional Card

Let’s Begin

Chain 3 at the start of each round counts as your first Double Crochet of that round (this is a Treble crochet in the UK). Pattern will be worked as a circle and then folded in half.
Slip stitch to the top of the chain at the end of each round, then chain 1, snip your yarn and pull
through to secure. You will then tie on your new colour on every round.
Starting with the bottom colour Chain 4 and join to the first chain to create a circle.


(Violet) Round 1 – Chain 3, and then make 11 DC into the circle. Slip stitch to the top of the chain 3,
and tie off. (12)
(Purple) Round 2 – With new colour chain 3, DC in the same stitch. 2 DC in each stitch around. SL, tie
off. (24)
(Blue) Round 3 – With new colour Chain 3, DC in the same stitch. Then *1 DC , 2 DC * repeat from *
to * all the way around. SL and tie off. (36)
(Green) Round 4 – With new colour chain 3, DC in the same stitch. Then 1 DC, 1 DC, 2 DC repeat
from * to * all the way around. SL and tie off. (48)
(Yellow) Round 5 – With new colour chain 3, DC in the same stitch. Then 1 DC, 1 DC, 1 DC, 2 DC
repeat from * to * all the way around. SL and tie off. (60)
(Orange) Round 6 – With new colour chain 3, DC in the same stitch. Then 1 DC, 1 DC, 1 DC, 1 DC, 2 DC repeat from * to * all the way around. SL and tie off. (72)
(Red) Round 7 – With new colour chain 3, DC in the same stitch. Then 1 DC, 1 DC, 1TC, 1TC 1 DC, 2 DC repeat from * to * all the way around. (84) SL and chain 1
Optional – If you want to make your semicircle more rigid it is at this point you can cut a semicircle
out of some stiff card, like a cereal box) and use it in your semicircle. I didn’t do this with mine as it
means it can’t go in the washing machine if needed.
Fold your circle in half. Continuing in your last colour you will now single crochet (Double in the UK) through BOTH sides of the semicircle to join it together. If you’d like to add a hanging loop then when you have done 21 Double crochet chain to create your loop and re-join and continue Double
Crocheting the semicircle together.
When you get to the end, chain 1, snip the yarn and pull through the yarn to secure the chain. You can then weave this end in.


Creating the tassels

You will need the following strands to create the tassels.
Colour 1 (Lilac) – 24
Colour 2 (Purple) – 16
Colour 3 (Blue) – 16
Colour 4 (Green) – 16
Colour 5 (Yellow) – 16
Colour 6 (Orange) – 16
Colour 7 (Red) – 24
To make the tassels you can either cut a piece of card the length you want the tassel to be and then wrap the yarn around or you could use a debit card or similar length ways (I used my phone). This is just an easy way to get all your strands about the same length. Wrap the yarn around the rectangle the number of times you need and then snip at one end. Take 2 tassels and fold in half to create a loop. Insert your hook through the bottom treble crochet
and pull through the loop. Then fold the strands down through the loop and pull tight. This will create your tassel. Continue this all the way along, the centre colour and end colour will have more strands as there is the extra row of Double crochet on the outside and the starting circle on the
inside. If you always insert your hook from the same side the front of your rainbow will look uniform. Then using your sharp scissors, you can trim the tassels to the same length. I lay mine on a cutting board, straightened the strands, lay down the metal ruler and used my cutting wheel to trim so that they were all the same length.

You are welcome to use this pattern to make items for gifting and/or selling, however please do not redistribute the pattern and instead share this page.

If you make one remember to tag me on insta, facebook or Tiktok @letscreateagift

Find me on Social Media for more free patterns, tutorials and crochet related chat


Tiktok – @letscreateagift
Ravelry – https://www.ravelry.com/designers/lets-create-a-gift
Etsy – https://www.etsy.com/uk/LetsCreateAGift/listing/791463659/pdf-pattern-crochet-7-colour-rainbow?utm_source=Copy&utm_medium=ListingManager&utm_campaign=Share&utm_term=so.lmsm&share_time=1652373499734

Facebook – https://www.facebook.com/letscreateagift/
Youtube –
https://www.youtube.com/channel/UCAqVuR1wC39D_31MovTXVJA?view_as=subscriber

Have fun and happy crocheting

Free Fingerless gloves pattern

We’re well and truly into autumn now and those chilly days just aren’t letting up at all! I’ve had this pattern half written for some time but just never got round to writing it up and getting it tested. I had originally started this in DK, but it just felt really thin and loose so I had some King Cole Shadow chunky left from a cardigan and decided it would be a great to have some matching mits and so the chunky criss cross fingerless mitten was born. I intend to adjust the pattern for flip mittens and also make the same style available in children’s sizes but for now here’s a free version of the ladies fingerless mits seen as it’s ready and maybe soon I’ll expand it into more variations. You are welcome to use this pattern to make items for gifting and/or selling, however please do not redistribute the pattern and instead share a link to this page 🙂

Cheap printable PDF version available on Ravelry
https://www.ravelry.com/patterns/library/fingerless-mittens–wrist-warmer

If you make one don’t forget to tag me on Instagram (or use hashtag #letscreateagift), Facebook or Tiktok @letscreateagift

Ravelry – https://www.ravelry.com/designers/lets-create-a-gift

Etsy – https://www.etsy.com/uk/shop/LetsCreateAGift?ref=seller-platform-mcnav

Facebook – https://www.facebook.com/letscreateagift/

Youtube – https://www.youtube.com/channel/UCAqVuR1wC39D_31MovTXVJA?view_as=subscriber

What you’ll need Size 5.5mm hook Chunky yarn – I Used King Cole Shadow Chunky Darning needle and scissors for cutting and weaving in your end Abbreviations SC – Single Crochet (UK Double Crochet) HDC – Half Double Crochet (UK Half treble crochet) DC – Double Crochet (UK Treble Crochet) BLO – Back loop only SS – Slip Stitch CH – Chain

Notes

HDC through both loops on the last stitch of the row will give your cuff a neater edge

CH1 does not count as your first stitch. R4 uses a criss cross stitch. Photos to help on the last page if needed so that you can print the patter without images to save ink if needed. So that the seam is on the side of the palm on both mitts Row 7 is different for each hand.

Let’s Begin

Cuff Row 1 – CH10. HDC in the 3rd CH from the hook and HDC to the end (8HDC and the CH2 for a total of 9stitches for the next row) Row 2 – CH1 (does not count as your first stitch), HDC in BLO in the next 8, HDC in the top of the CH2 from Row 1. Row 3 – CH1, HDC in BLO in the next 8, HDC in the last stitch (through both loops) Row 4 – 14 – Repeat row 3 Fold in half, CH1, SS through the back loop of the HDC and through the starting CH to join both sides together. Now is a good time to check it fits over your wrist. If it doesn’t you can add an extra row or 2 (or go up half a hook size to make your stitches more loose and stretchy) Flip the cuff inside out so that your seam is now on the inside. You will now be working in rounds around the OUTSIDE of your cuff to create the hand section. R1 – CH1, SC evenly around the cuff to create 24 SC R2 – CH1, SC around, SS to join (24)

R3 – CH1, SC around, SS to join (24)

R4 – CH2, *Skip 2 and DC in the third, DC in the next stitch, DC in the first skipped stitch, DC in the second skipped stitch* repeat from *to* all the way round. You should have 6 crosses (24) R5 – CH1, SC around, SS to join (24)

R6 – CH1, SC around, SS to join (24) RIGHT HAND R7 – CH1, SC in the next 19, CH4, SK4, SC in the last stitch, SS to join.

LEFT HAND R7 – CH1, SC in the first stitch, CH4, SK4, SC in the next 19, SS to join. R8 – CH1, SC around, including in each chain, SS to join (24) R9 – (repeat of row 4) CH2, *Skip 2 and DC in the third, DC in the next stitch, DC in the first skipped stitch, DC in the second skipped stitch* repeat from *to* all the way round. You should have 6 crosses (24)

R10 – CH1, SC around, SS to join (24) R11 – CH1, SC around, SS to join (24)

R12 – CH1, SC around, SS to join (24)

R13 – SS in each stitch and then tie off and weave in your end.

And there you go, super quick and comfy fingerless gloves. Pictures below from myself and one of my pattern testers.

FREE Boob Keyring pattern

These golden boobies were a joy to make and were to celebrate a year of breastfeeding, hence the golden colour. I’ve made so many of
It’s also breast cancer awareness month starting on the 1st October so now seemed a great time to share my free boobie pattern.
These for other people on request, to celebrate breastfeeding milestones from sapphire blue to diamond and they’re really quick to make (all be it a little fiddly). Of course you can make them in any colour and I’ve done some little skin tone ones too, as well as big plush sized ones (I have a separate pattern for that which I’ll get on the blog if there’s interest) *links may be affiliate links or to my own store. Affiliate links will take you to the website as normal but I might earn a couple of pence just for you visiting via my link. It costs you nothing but helps me to keep the free patterns going.

What I used

· Any colour DK Yarn, I used Stylecraft Gold and Camel which you can buy https://www.deramores.com/products/stylecraft-special-dk?variant=50359062087

· 3mm Crochet hook

· Small amount of stuffing or yarn scraps

· Stitch marker (optional) – I have these lightweight ones available here – https

· Scissors

· Needle for weaving in ends

· Keyring

You can either start with a magic circle or you can chain 4 and join. I prefer the magic circle as it can be pulled tighter.

As this is made by working in continuous rounds a stitch marker may be useful however as there are not many stitches per round, I find it easier to just count the stitches.

Round 4 is made using Back Loops Only (BLO)

MC – Magic Circle

SC – Single Crochet

BLO – Back Loops only

SL – Slip Stitch

Ch – Chain

Pattern

Magic circle

  • R1 – 6 SC into the MC
  • R2 – 2 SC in each stitch around (12)
  • R3 – *1SC, 2SC* repeat around to create 18 Stitches (18) If you want to make this into a keyring then chain 10 and reattach to the base of the chain to create a keyring loop.
  • R4 – SL to join, Ch1, SC in BLO (18). (this will turn your work upwards to form the top of the keyring)
  • R5 – Sc (18)
  • R6 – *SC, SC2TOG* Repeat around to create 12 stitches
  • R7 – sc 12
  • R8 – SC2TOG x6 (6)

Slip stitch into opposite side to bring closed.

Ch 6, cut yarn leaving a long tail for sewing and sew this chain in a spiral on to the boob to create the nipple. For a more pronounced nipple chain more, for a flat nipple chain less or just sew closed without the chain. Play around with the colours and don’t forget to share on social media so I can see your awesome boobies! Tag me @Letscreateagift on instagram, tiktok or facebook.

FREE cat toy joint pattern

We recently took in 2 black kittens from the local cat sanctuary and they came to us with nothing more than a blanket and a stuffed teddy. So… seen as we didn’t have any pets already they definitely needed some new toys to keep them occupied. I love a fun make so I couldn’t resist making a cat toy that was a bit different from the usual fish and mouse toys. We don’t even smoke in this house but there’s something funny about a kitty with an oversized doobie, joint, cigarette or whatever else you might call it locally.


I made mine using left over bamboo and 100% cotton yarn as this seemed safer and longer lasting than using acrylic.
If you’d like to buy this pattern so you can print or view it ad free any time you can buy it on Etsy or Ravelry using the links below.

ETSY (use code LCAGBLOG for 24% off)- https://www.etsy.com/uk/listing/1412945024/pdf-crochet-cat-toy-pattern-cat-joint?click_key=ffe9d72feadc7d66e720a19eb66ea1955ae33c3b%3A1412945024&click_sum=46bdd473&ref=shop_home_active_3

Ravelry
https://www.ravelry.com/patterns/library/novelty-cat-toy-doobie-joint

What you’ll need
You’ll need DK in the following colours – White, Black, Red, Orange
2.5mm hook (this keeps the stitches small so stuffing doesn’t show through the holes)
needle and scissors for taking care of those ends.
stuffing
optional cat nip.(I didn’t use any in my first one and the kittens loved it anyway)
optional stitch marker

Notes
This toy is worked in continuous rounds so it may be helpful to have a stitch marker so that you can track where each round starts and ends. This super easy project only uses single crochet (Double crochet in UK terms) and if you’re not confident with colour changes just tie off the colour and attach your new one. This project starts with a magic circle so that you have a tight closing to prevent any stuffing from coming out. I highly recommend this video if you struggle with the magic circle https://www.youtube.com/watch?v=EPBHAXenbsU&t=29s
(but if you’re really stuck then use a ch4,join and crochet into the center and sew the hold closed)

Terminology
SC – Single Crochet (UK Double Crochet)
inc – Increase (2 Single crochets into 1 stitch)
dec – Decrease (Single crochet 2 stitches together)

Let’s Create a cat toy
R1 – Magic circle and crochet 6SC into the ring (6)
R2 – (inc, SC2) 2 times (8)
R3 – (inc, SC3) 2 times (10)
R4 – SC2, Inc, SC4, Inc, SC2 (12)
R5 – SC in each stitch (12)
R6 – SC3, Inc, SC5, Inc, SC2 (14)
R7-R13 – SC in each stitch (14)
R14 – Change to Black , SC in each stitch (14)
You’ll want to start stuffing it now before the hole gets too small, you can also add catnip now if you want to and mix it with your stuffing.
R15 – Change to Red, SC5, dec, SC5, dec (12)
R16 – Change to Orange, (SC, dec) 3 times (6)
Sew closed and leave the long thread inside.

And there you have it, a new cat toy. Throw it and wait for your fur ball to pounce!

If you make one don’t forget to tag me on Instagram or Facebook @letscreateagift and use the hashtag #letscreateagift.

Ravelry – https://www.ravelry.com/designers/lets-create-a-gift

Etsy patterns, supplies and more – https://www.etsy.com/uk/shop/LetsCreateAGift?ref=seller-platform-mcnav

Facebook – https://www.facebook.com/letscreateagift/

Youtube – https://www.youtube.com/channel/UCAqVuR1wC39D_31MovTXVJA?view_as=subscriber

*Pattern may include affiliate links which allow me to earn a couple of pence if you buy via my link, the price is still the same for you but it helps to allow me to keep providing free patterns and tutorials

FREE Pumpkin Coaster and Bunting pattern

Pumpkin Coaster

Pattern by Let’s Create a Gift Pattern written in UK terms but US conversion is included.

Autumn is on the way here!! Get snuggled in with your hot choc and make your self a new seasonal coaster to match.

I’d highly recommend using cord for coasters as it’s thick, sturdy and will lay flat. It’s also machine washable should you spill your drink on it. A cheaper alternative is using cotton. To get a decent size coaster I’d recommend using Aran weight as a minimum, but you could also use 2 strand of DK cotton. Acrylic and wool fibres aren’t great for coasters as they soak up liquid easily and they loose shape when washed. However, you could use this pattern to make a bunch of pumpkins and hang them on a string for some awesome seasonal or Halloween bunting decorations.

What you’ll need

Macrame/cotton Cord – Orange and Brown or Green

5mm crochet hook Large Eyed Needle for weaving in your last end.

You can also make this using any yarn, see images also using

cotton and acrylic DK/Light Worsted. Just adjust your hook

size according to the yarn you choose.

Notes

The CH at the start of the round does not count as a stitch. Blocking is not needed as cord likes to lay flat and holds its’ shape well. Pattern starts with a Magic circle (also known as the magic ring), but if you really struggle with this then you can chain 4, join to the first chain to create a loop and work your first round of stitches into that loop. The magic circle gives a tighter hole in the center. If you need help with the magic circle please visit the link at the bottom of the page for a link to a youtube video. Number in brackets is the total number of stitches for that round.

Abbreviations
CH – Chain
SL – Slip Stitch
DC – Double Crochet (US SINGLE CROCHET)
HTC – Half Treble Crochet (US HALF DOUBLE CROCHET)
TC – Double Crochet (US DOUBLE CROCHET)
DC2TOG – Double Crochet 2 Together (US SINGLE CROCHET 2 TOGETHER

If you struggle with the Magic Circle check out this video. https://www.youtube.com/watch?v=EPBHAXenbsU
Or you can CH4 and join t make a circle to crochet into instead if preferred.

Let’s Begin
Start with your Orange yarn
Round 1 – Create your magic circle, CH2, 12 TC into the ring (12). SL to complete the round.

Round 2 – CH2, then 2 TC into each stitch all the way around (24). SL to complete the round.

Round 3 – CH1, 2 HTC in the first stitch. *1 TC, 2TC* repeat from * to * a total of 4 times (so using the next 8 stitches). 1 HTC in the next stitch, 2 DC in the next, SL in the next. Now you will be half way around and we’ll work the next half in the same way but reversed. 2 DC in the next stitch, 1 HTC, *2TC, 1TC* repeat 4 times in total, HTC in the next stitch. Tie off and weave in your orange end.
Attach your Brown or Green in the top of the Orange HTC where you tied off (photos shown on downloadable PDF or youtube tutorial. DC in the top of the HTC, DC in the base of the HTC, DC in the Orange TC that was left from the previous round, DC in the base of the next HTC, DC in the top of the HTC. You will now have 5 DC. CH1, turn. DC2TOG, DC, DC2TOG (3) CH1, turn, DC, DC2TOG (2)

CH1, turn, DC,DC (2)

CH1, turn, DC, DC (2)

CH1, turn, DC2TOG (1)

CH1, Turn, DC Tie off and weave in your end. And there you have it, a perfect pumpkin for Halloween! And for the perfect Halloween decoration you can crochet a whole bunch of these, add to a length of your cord for some funky seasonal bunting and window decorations!

You are welcome to use this pattern to make items for gifting and/or selling, however please do not redistribute the pattern freely and instead share where you found the pattern.

If you make one don’t forget to tag me on Instagram or Facebook @letscreateagift and use the hashtag #letscreateagift.

Tutorial for Coaster – https://www.youtube.com/watch?v=4qZpZF–5FA

Ravelry – https://www.ravelry.com/designers/lets-create-a-gift

Etsy patterns, supplies and more – https://www.etsy.com/uk/shop/LetsCreateAGift?ref=seller-platform-mcnav

Facebook – https://www.facebook.com/letscreateagift/

Youtube – https://www.youtube.com/channel/UCAqVuR1wC39D_31MovTXVJA?view_as=subscriber

*Pattern may include affiliate links which allow me to earn a couple of pence if you buy via my link, the price is still the same for you but it helps to allow me to keep providing free patterns and tutorials

FREE Baby Leg Warmers pattern

We’ve had April showers and now it’s a windy May day. If you have a little one that loves leggings, or maybe a baby that you love to wear in the sling these are perfect!

Pattern shown was made using several colours yarns however the pattern does not indicate colour changes and you can make all in one colour or change whenever you like. This is a great quick project for using up those yarn scraps.
If you make some please tag me on social media (instagram,facebook,tiktok) @letscreateagift
This pattern is available to download, Ad free, in both UK and US terms on etsy and ravely.

https://www.etsy.com/your/shops/LetsCreateAGift/tools/listings/759460421
I searched for baby leg warmers on-line, but all the patterns seemed to be for thigh high warmers or child size and I only wanted some for the bottom part of the legs for when baby is in a sling. So here we are. This pattern can be used to make any size leg warmers just by increasing (or decreasing) the number of repeats on the starting row. The written pattern was for leg warmers to suit a baby aged 6-12 months)


You will need

Size G/6 (UK 4mm) crochet hookLight Worsted/DK yarn (I started with Stylecraft Cream and then used a selection of other yarn ends, all DK but various makes and colours)Needle for sewing in your ends1 meter of ribbon (if you don’t have this they can be made without)Scissors


Terminology

CH – Chain

SC – Double Crochet

HDC – Half Double Crochet

BLO – back loops only

SK – Skip a stitch

SS – Slip stitch


Let’s create some baby leg warmers

Creating the cuff Ch5, Turn, SC in the 2nd Ch from the hook. SC in each (4)*Ch1, SC in BLO in each stitch* (4) Repeat for 20 rows (add extra rows if you need it bigger or fewer rows if its for very skinny legs) If you’re not confident to do Back loops only you can SC in the stitch as normal but you won’t get the ribbed effect. Join the 2 ends together using a slip stitch and then SC through BOTH ends to join the ends and create the ribbed cuff. Creating the leg warmer. No need to tie off from creating the cuff

Row 1 – Ch1, SC around the edge of the ribbed cuff, 1 SC in each row (20)If you want to change colour from the cuff colour now’s the time to do it.

Row 2 – *CH2, HDC in each stitch around* Repeat * to * (20) SL to join.

Row 3 to 6 – Repeat row 2 6 more times for a total of 7 rows of HDC. If you want to change back to the cuff colour now’s the time to do it.

Row 8 – CH1, SC in each stitch around

Row 9 – CH2, *HDC, CH1, SK1* Repeat * to * all the way around SL to the top of the CH2 to join (10 spaces)

Row 10 – CH1, SC in the top of the HDC, SC in the CH space from the previous round. Continue around and SL to the CH1 to complete (20)Row 11 – CH1, *SC, (HDC TC HDC), SC * Repeat another 4 times to make 5 shell shapes for the top boarder. Tie off and weave in your ends.

*Alternative Row 11 – If you don’t want the shell shape on the top you can also just CH2 and HDC all the way around (20) and tie off.

Cut your 1 meter ribbon in half and then use 50cm to weave in and out of the HDC spaces you made on Row 10. Tie with a Bow and finish. If you don’t have any ribbon you could also make a chain 50cm long and use this to weave in and out if preferred.

And there you have it, a cute baby leg warmer. Just repeat again for the other leg and you’re all done.
Don’t forget to share your photos with us on insta, tiktok or facebook as we love to see your makes.